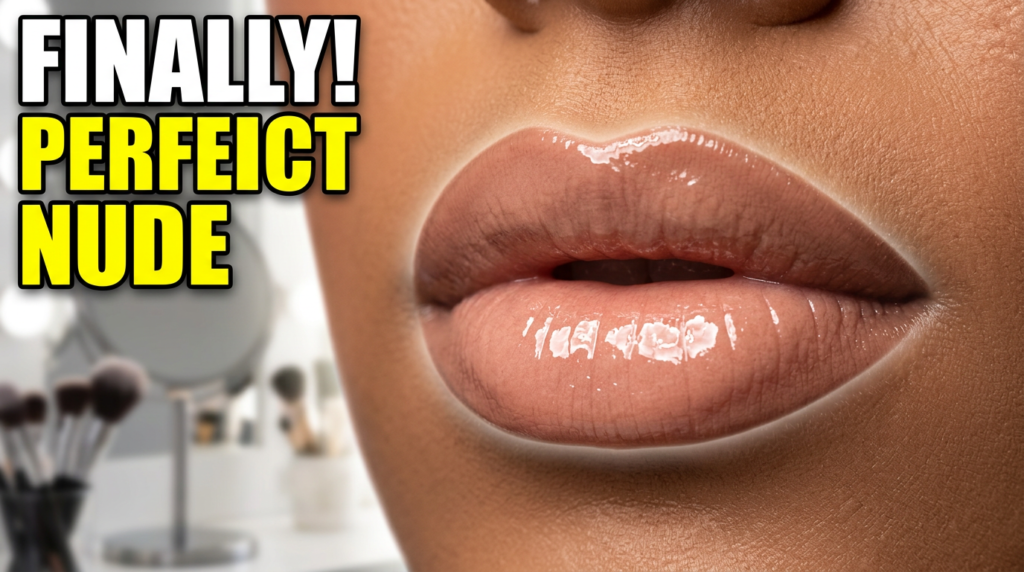
The 3-Step Formula for the Perfect Nude Gloss Lip
Here is a secret worth knowing: the “one” perfect nude lipstick does not exist. So you can stop searching. And honestly? That is genuinely great news. Because the key to a flawless nude gloss lip is not about finding the one perfect product — it is about using the perfect technique.
For years, makeup artists have used a simple 3-step layering trick to create a custom nude shade that looks incredible on any skin tone. And once you know it, you will never struggle with nude lips again.
Why Your Nude Lipstick Keeps Letting You Down
We have all been there. You see a gorgeous nude lipstick online, you buy it, you rush home to try it on — and something is just off. It either washes you out completely, or the colour looks chalky and weird on your lips. So, into the drawer it goes, along with the ten other “perfect” nudes that already let you down.
The problem is not you. It is not even the lipstick. The problem is the myth that a single tube of colour is supposed to do all the heavy lifting on its own.
A true nude lip should enhance your features, not erase them. It is meant to harmonise with your unique skin tone and natural lip colour. The reason makeup artists nail it every single time is because they are not just swiping on one product. They are building, shaping, and customising the colour with a layered approach.
It all comes down to a simple 3-step formula. Once you learn this, you will be able to make almost any nude lipstick work for you.
Step 1: Define With Lip Liner
First up — and this is probably the most important step — is lip liner. If you have been skipping this, you have been skipping the solution to 90% of your nude lip problems.
Lip liner is the foundation of the whole look. It creates definition so your lips do not simply disappear into your face, it stops the lipstick from bleeding outward, and most importantly, it adds the depth that a single lipstick can never provide on its own.
Choosing the Right Shade
The key is picking the right liner shade. You want one that is one or two shades deeper than your natural lip colour — not your skin tone. That is a super important distinction. You are not matching the lipstick; you are creating a subtle shadow anchor underneath it. Think neutral browns, rosy browns, or mauvy tones.
How to Apply It
The goal is a soft, defined shape — not a harsh, obvious line. Start by gently outlining your lips. If you want to create a fuller look, you can cheat very slightly by overlining just the centre of your bottom lip and your cupid’s bow. Stick to your natural lip line at the corners, though. That little trick gives you a rounder, softer shape without looking unnatural.
Once you have the outline, here is the real secret: do not just leave it as a line. Gently feather the liner inward toward the centre of your lips. Use light, sketchy motions with the pencil, or blend it with a small brush or even your finger. You want to shade in roughly the outer third of your lips, creating a soft gradient that is darkest right at the very edge.
This technique instantly pushes the centre of your lips forward, making them look noticeably fuller — before you have even touched your lipstick.
Step 2: Add the Core Colour
Now that you have a defined, dimensional base, it is time for the lipstick. But notice that its job is completely different now. It is not trying to do everything alone anymore. Its only job is to fill in the centre and be the bright, beautiful focal point.
For this step, grab a nude lipstick that is lighter than your lip liner. This is also where knowing your skin’s undertones becomes really helpful.
- Fair, cool-toned skin — nudes with a hint of pink look amazing
- Medium, olive, or warm skin — beiges, peachy nudes, or caramels work beautifully
- Deeper skin tones — rich caramels and warm cocoa shades bring gorgeous richness without ever looking ashy
The contrast between the deeper liner and the lighter lipstick is precisely what creates that pro-level, three-dimensional effect.
When applying, focus the colour right on the centre of your lips — that bare area you left empty. Apply it from the tube or with a brush, then gently press your lips together. You can also use your finger to tap and blend the spot where the lipstick meets the liner. You want that transition to feel completely seamless.
The result is a subtle ombré effect — deeper at the edges, gradually lighter toward the centre — that genuinely enhances the fullness you already built with the liner.
As Byrdie’s guide to the best nude lipsticks by skin tone explains, the biggest mistake most people make with nude lips is choosing a lipstick shade in isolation, without considering how it interacts with their natural lip colour underneath. The liner step fixes exactly that problem.
Step 3: Create Dimension With a Nude Gloss Lip
You could absolutely stop at Step 2 for a beautiful, velvety matte finish. But if you want that modern, plush, pillowy look — the one that defines the nude gloss lip — the final step is where the magic actually happens.
Gloss ties everything together. It adds a layer of shine that catches the light and makes your lips look even fuller. But how you apply it is everything.
This is not about slathering on a thick layer of product all over. Instead, take a clear, sheer nude, or lightly shimmery gloss and apply it only to the very centre of your bottom lip and right on your cupid’s bow.
Why Only the Centre?
Because that is where you want to draw the eye. Concentrating the shine in one spot creates the ultimate illusion of fullness — without the uncomfortable sticky feeling of a fully glossed lip. When you press your lips together, the gloss diffuses just enough to look natural, but it will not spread all the way to the edges. That keeps your Step 1 liner looking crisp and clean.
The gloss also does something else entirely: it melts all the layers of liner and lipstick together, making the colour read as one cohesive, custom shade that looks like it was made specifically for you. This is a genuine game-changer across all skin tones — but especially for deeper complexions, where it adds remarkable life and dimension to the overall look.
According to Glamour’s breakdown of the best glosses for a fuller lip, the centred-gloss application technique is one of the most consistently recommended tricks by professional makeup artists for creating the illusion of volume without any filler.
The Complete Nude Gloss Lip Formula at a Glance
The full look is defined, dimensional, and perfectly toned to you. Here is the formula simplified:
Step 1 — Define: Start with a liner one to two shades deeper than your natural lip colour. Line and softly shade the outer edges inward.
Step 2 — Colour: Fill in the centre with a lighter nude lipstick. Blend the edges where the liner meets the lipstick until seamless.
Step 3 — Dimension: Finish with a pop of gloss right in the centre of your bottom lip and cupid’s bow for shine and fullness.
The next time you are about to go searching for another “holy grail” nude lipstick, try this technique first. The products you already own are very likely capable of giving you the nude gloss lip you have always wanted — you just needed the right approach to get there.
FAQ Section
Q1: What is a nude gloss lip? A nude gloss lip is a lip look that combines a nude lipstick base with a clear or sheer gloss applied to the centre of the lips. The result is a natural, skin-toned finish with a plush, dimensional shine that makes lips look fuller and more polished.
Q2: How do I find the right nude shade for my skin tone? The key is matching your undertone rather than just your skin colour. Fair, cool-toned skin suits nudes with a pink or rosy hint. Medium and olive skin tones look great in peachy nudes and warm beiges. Deeper skin tones suit rich caramels and warm cocoa shades that add depth without looking ashy.
Q3: What lip liner should I use for a nude gloss lip? Choose a liner that is one to two shades deeper than your natural lip colour — not your skin tone. Neutral browns, rosy browns, and mauvy tones work well across most complexions. The liner creates the shadow anchor that gives the entire look its depth and definition.
Q4: Can I wear a nude gloss lip every day? Absolutely. In fact, the nude gloss lip is one of the most low-maintenance, versatile makeup looks you can do. It transitions easily from casual daytime wear to professional or evening settings, making it ideal for everyday use.
Q5: What type of gloss works best for this look? A clear, sheer nude, or lightly shimmery gloss works best. You do not need anything thick or overly sticky. The goal is a soft, centred shine that catches the light and creates fullness — not a heavy gloss layer across the entire lip.
Q6: Why does my nude lipstick always look chalky? Usually, it is because the lipstick shade is too light or too cool for your natural lip undertone. Adding a deeper lip liner first — blended inward — gives the nude lipstick something to work with and prevents that flat, washed-out appearance. The gloss on top also adds warmth and dimension that fights chalkiness.
Q7: Do I need expensive products for a nude gloss lip? Not at all. The technique matters far more than the price point here. A drugstore lip liner, a mid-range nude lipstick, and a basic clear gloss can produce results that are just as beautiful as high-end alternatives — as long as the shades are chosen well and the layering method is followed.
Muhammad Awais is the founder of PeakRank Agency LLC, a white-label link building company helping SEO agencies and SaaS brands grow organic traffic through editorial guest posts and contextual link placements. With hands-on experience as a Senior SEO Specialist and Link Builder, he manages a vetted network of 2,000+ quality websites across multiple industries. His focus is on niche-relevant, white-hat link building that delivers real, long-term results.