Sheer White Nails — The Deceptively Simple Trend Everyone Gets Wrong
What if making your nails look expensive was actually about making them look barely painted?
That is exactly the idea behind sheer white nails. This soft, milky look is everywhere right now. You see it on celebrities, models, and anyone chasing the “clean girl” aesthetic.
However, getting this look at home is surprisingly hard. Most people end up with streaky, chalky nails instead of that dreamy milky finish. So today, that changes. Below are the exact secrets nail artists use — including a simple hack you can try right now.
What Makes Sheer White Nails So Special
Sheer white nails are clean, soft, and always polished-looking. They sit in that perfect space between a bare natural nail and a fully styled one.
Unlike a bold red or an opaque white, this look is all about translucency. One coat too many and it turns chalky. Too little and the effect disappears completely.
But when you get it right, the result is a soft, milky finish that makes hands look instantly more elegant. That is also why this manicure works for literally everything — weddings, job interviews, or just everyday wear.
The Real Problem With Sheer White
Here is something most people do not realise. Sheer white nails are not really about the colour white. They are about the illusion of white.
You are not painting a solid colour. Instead, you are casting a soft, translucent veil over your natural nail. That transparency is what creates the expensive-looking effect.
This look comes from polishes labelled “milky white” or “sheer jelly.” These formulas let your natural nail show through slightly. So your nail blends with the polish rather than just being covered by it.
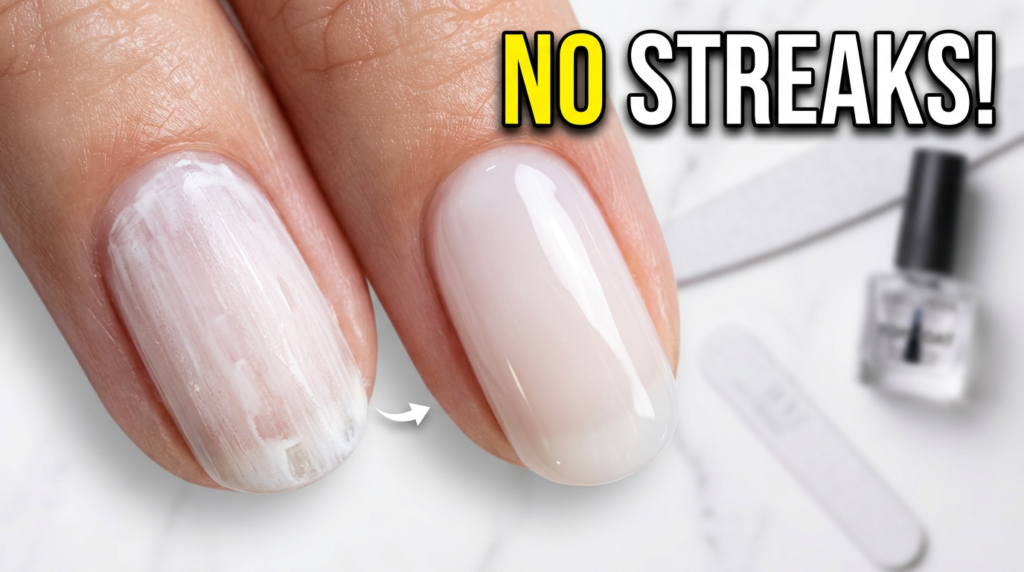
However, this is also where the trouble begins. White pigment is naturally designed to be opaque. So in a sheer formula, getting it to lay down evenly is genuinely difficult. The result? Streaks and patches — no matter how carefully you apply it.
You put on the first coat. It looks patchy. Then you add a second coat to fix it. But the brush just drags the first layer around and makes everything worse.
Sound familiar? As Allure notes in their nail guides, sheer and milky formulas are among the most technically demanding polishes to apply — even for professionals.
Why This Look Stays So Popular
So why does everyone keep coming back to a trend this difficult?
Because it solves a real style problem. Sheer white nails answer the question: how do you look polished without looking overdone?
They blur small imperfections on the nail bed. They also brighten the look of your hands. Additionally, they give a clean finish without the hard lines of a French manicure or the intensity of a dark colour.
But the beauty here is technical. So the application is just as unforgiving.
If the formula is too thick, it drags and streaks. If the nail surface has ridges, the polish pools unevenly. And if you press too hard with the brush, the strokes dry right into the finish.
Nail pros do not fight this. Instead, they work with it. They build the look in very thin layers. The first coat looks like a mess — and that is completely fine. The second coat is where the real magic happens.
3 Professional Secrets That Actually Work
Secret 1: Prep Is Everything
For sheer polish to sit smoothly, the surface must be perfect first.
Start by shaping your nails and gently pushing back the cuticles. Then lightly buff the nail surface to smooth out any ridges. Finally, wipe each nail with a lint-free pad soaked in rubbing alcohol. This removes all oil and helps the polish grip evenly.
Some nail pros also apply a thin layer of clear builder gel as a base. This creates an extra-smooth canvas before any colour goes on. It sounds like a lot. But skipping prep is almost always the reason the manicure goes wrong.
Secret 2: The Floating Technique
This is the most important skill difference between a salon result and a home result.
When applying sheer polish, do not press down. Instead, load the brush with a small bead of polish. Place it near the cuticle. Then gently float it down the nail with the lightest possible touch.
This stops the bristles from dragging. No dragging means no streaks.
The first coat will still look patchy — and that is completely normal. So let it dry fully. Then repeat the same light floating motion for the second coat.
Secret 3: Make Your Own Sheer Polish
This is the hack that fixes everything.
Take a bottle of basic clear polish. On a small palette or piece of foil, mix a few drops of clear polish with just one tiny drop of opaque white. Stir it together and test the colour. It should look like a soft, milky wash.
Too sheer? Simply add another tiny speck of white.
This custom mix gives you full control over opacity. It also usually applies far more smoothly than pre-made sheer formulas. According to Byrdie’s nail tutorials, mixing your own sheer tone is one of the most underrated tricks for a salon-quality result at home.
Step-by-Step Tutorial
Step 1 — Prep Your Nails
Shape your nails and gently manage the cuticles. Then lightly buff the surface to remove ridges. Finally, wipe each nail with a rubbing-alcohol-soaked pad to remove all dust and oils.
Step 2 — Apply Base Coat
Use a good quality base coat. A ridge-filling formula works especially well here. Let it dry completely before moving to the next step.
Step 3 — The Ghost Coat
This first colour layer should be barely visible. Use the floating technique — light strokes, small bead of polish, zero pressure. It will look streaky and uneven. That is totally normal. Let it dry fully and do not touch it.
Step 4 — The Second Coat
Apply a second layer using the same light floating technique. This is where the milky, polished finish finally comes together. For most people, two coats is the perfect sweet spot.
Step 5 — Seal With Top Coat
Apply a thick, high-gloss gel-effect top coat. Make sure to cap the free edge — swipe the brush along the very tip of the nail. This seals in the colour, prevents chipping, and gives the look its signature glassy finish.
Sheer White as a Nail Art Base
Once you master the basic milky manicure, you will quickly realise it is also a starting point for minimalist nail art.
It is the foundation of the “glazed donut” nail — a sheer base burnished with a pearlescent chrome powder on top. It also works perfectly as the base for a modern “baby boomer” ombre fade into a soft French tip.
Tiny pearls near the cuticle look stunning against the white background. Delicate gold foil, micro-floral details, or even a single black dot all stand out more because the base is so clean and quiet. The sheer white base is, in short, the white linen shirt of nail art — simple alone, and perfect as a base for anything layered on top.
Final Thought
Sheer white nails prove that the most powerful statement is not always the loudest one.
Sometimes the most sophisticated choice whispers instead of shouts. It looks effortlessly simple — until someone gets close and realises just how much technique went into it.
That is the real magic of this trend. It is not just a colour. It is artistry. A manicure that feels luxurious by being softer and more refined — not just bolder.
6. FAQ Section
Q1: What are sheer white nails exactly? Sheer white nails are a semi-translucent, milky nail look. They sit between a bare natural nail and a fully opaque white polish. A sheer jelly formula lets some of your natural nail show through, creating a soft, cloud-like finish.
Q2: Why do sheer white nails look streaky? White pigment is naturally opaque, so it is very hard to apply evenly in a sheer formula. The first coat will almost always look patchy — however, this is normal. The key is building thin layers with a light floating technique, not pressing hard with the brush.
Q3: How many coats do sheer white nails need? Two coats is usually the sweet spot. The first coat creates a base. The second coat is where the milky finish appears. A third coat is possible, but it risks pushing the look into flat, chalky territory.
Q4: Can I make sheer white polish at home? Yes — simply mix a few drops of clear polish with one tiny drop of opaque white on a palette. Adjust the ratio until you reach your preferred opacity. It often applies more smoothly than store-bought sheer formulas.
Q5: What top coat is best for sheer white nails? Use a thick, high-gloss gel-effect top coat. Always cap the free edge by swiping along the nail tip. This prevents chipping and gives the look its glassy, salon-quality finish.
Q6: Do sheer white nails suit short nails? Absolutely. They are, in fact, one of the most flattering options for shorter nails. The translucency creates a brightening and lengthening effect that full opaque colours often cannot.
Q7: What nail art works on a sheer white base? Chrome powder, baby boomer ombre, tiny pearls, gold foil, micro florals, or a single dot accent all look stunning. Because the base is so clean, every detail stands out much more clearly.
Muhammad Awais is the founder of PeakRank Agency LLC, a white-label link building company helping SEO agencies and SaaS brands grow organic traffic through editorial guest posts and contextual link placements. With hands-on experience as a Senior SEO Specialist and Link Builder, he manages a vetted network of 2,000+ quality websites across multiple industries. His focus is on niche-relevant, white-hat link building that delivers real, long-term results.